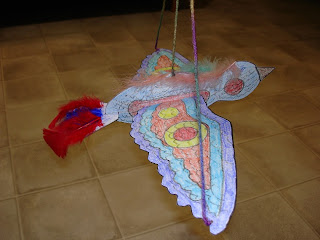
 For this art class, our assignment was to create a 3D paper bird. The teachers introduced the lesson by showing a video about a flock of birds that did not accept another bird because it was different than they were. The focus of the lesson was diversity; we are all different, and these differences are what make each person uniquely beautiful. We were to create our own bird with its own unique looks and personality.
  Before we began our art, we wrote a description of our bird on a note card. I decided to name my bird “Red Cheeked Flyer.” My bird is a native of the Tropics. The bird’s beautiful designs are reflected in his easygoing nature. The Red Cheeked Flyer is friends with all birds and will be the first to make friends with new birds that arrive in its territory. The bird uses his sharp eyes to hunt for food and detect danger from far away.
 Once we were done with our note card brainstorm, we began cutting out the outline of bird parts (body, winds, tail). Then we colored the bird with patterns and designs to give it a textured look. We were also required to apply tactile texture on the bird using feathers and/or tissue paper. When finished decorating, we glued the pieces together, we punched holes on the bird’s body and wings, and attached three pieces of yarn to hang our completed bird.
An extension activity for this lesson would be in science when students learn about different types of animals and their habitats. The teacher would create different spaces consisting of different habitats on the ceiling of the classroom. Then each student will construct an animal (the outline would be provided by the teacher) from a different habitat. When their animal is completed, the students will hang it in the space where their animal’s habitat is located.
No comments:
Post a Comment