Tuesday, November 22, 2011

Little Leaves

Our assignment for this class was to create a leaf collage using wax paper and oil pastels. To motivate the students, the teachers first read the book “The Little Yellow Leaf.” After the story, the teachers prompted a discussion of changing seasons and different colored leaves while also discussing warm and cool colors.
To begin the art project, the students were asked to write their favorite fall memory on an index card. Then each student was provided with a piece of wax paper and three warm colors (red, yellow, and orange). Using a file, the students grated the crayons to create red, yellow, and orange shavings. When we had enough shavings, we folded the wax paper and ironed it to melt the shavings creating a colorful collage. Then we cut at least three warm colored leaves from the wax paper and pasted them on a piece of white paper. Next, we used oil pastels to draw cool colored (blue, green, and purple) leaves on the white paper mixing them in to create a collage reflecting a pile of colorful leaves. The photo to the left is my leaf collage.

An extension activity with this wax paper collage lesson would be in 3-5 grade science when students learn about the different planets in the solar system. Similar to our assignment, the students would grate various different colored crayons on pieces of wax paper to create different mixes of colored collages. Then the students would cut out pieces of the colored wax paper that have colors most similar to each of the planets (e.g. bluish for Neptune and Uranus; red orange for Venus and Jupiter, etc.) When the students have all the planets cut out, they would paste them in the correct order on a piece of white construction paper with one fact of each planet written beside each or their wax paper planets.   

Under Water World

For this class, our assignment was to create an underwater world scene using black scratch-art paper. The teachers first introduced the lesson with a discussion of what animals we might find in the ocean, reviewed the important vocabulary words for this lesson, and presented some examples of scratch art for students to look at. Then each student was provided with a pointed wooden dowel (this was used to draw on the scratch paper) and a small sample of the scratch paper to practice drawing on it. After we had practiced with the sample piece of scratch paper, we began our own scratch art.

From a variety of pictures, we chose an underwater creature that we would like to draw. Once we had chosen our preferred picture, we sketched the picture in the center of a folded 8.5 x 11 blank paper. Then we put a piece of the scratch paper in between the folded 8.5 x 11 and traced the picture with the pointed dowel to the scratch art. After we had traced the picture to the scratch paper, we used the dowel to scratch our drawing onto the black scratch paper; adding details and an appropriate background using lines, shading, and pressure. The following is a photo of my underwater world scene.

An extension activity with this scratch art lesson would be in geography when students learn about the seven continents. Students would choose the continent of their choice and draw it on a piece of art scratch paper. Then students would do some research on their choice of continent and write some interesting facts about the continent on an index card. When finished, the students’ drawings would be posted on a bulletin board including their index card with the facts written on it. Then the whole class would view the drawings and each student would explain an interesting fact about their continent. 


Thursday, November 10, 2011

Birds of Feather

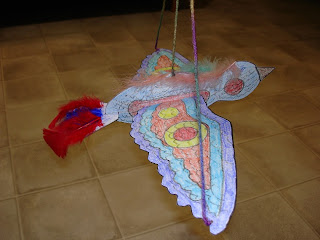
For this art class, our assignment was to create a 3D paper bird. The teachers introduced the lesson by showing a video about a flock of birds that did not accept another bird because it was different than they were. The focus of the lesson was diversity; we are all different, and these differences are what make each person uniquely beautiful. We were to create our own bird with its own unique looks and personality.

Before we began our art, we wrote a description of our bird on a note card. I decided to name my bird “Red Cheeked Flyer.” My bird is a native of the Tropics. The bird’s beautiful designs are reflected in his easygoing nature. The Red Cheeked Flyer is friends with all birds and will be the first to make friends with new birds that arrive in its territory. The bird uses his sharp eyes to hunt for food and detect danger from far away.

Once we were done with our note card brainstorm, we began cutting out the outline of bird parts (body, winds, tail). Then we colored the bird with patterns and designs to give it a textured look. We were also required to apply tactile texture on the bird using feathers and/or tissue paper. When finished decorating, we glued the pieces together, we punched holes on the bird’s body and wings, and attached three pieces of yarn to hang our completed bird.
An extension activity for this lesson would be in science when students learn about different types of animals and their habitats. The teacher would create different spaces consisting of different habitats on the ceiling of the classroom. Then each student will construct an animal (the outline would be provided by the teacher) from a different habitat. When their animal is completed, the students will hang it in the space where their animal’s habitat is located.

Beaded Clay Necklace

For this art class our assignment was to make a beaded necklace with molding clay. After reviewing the main vocabulary words for this class and showing the students some sample beads, the teachers provided each student with a handful of clay. Then the students kneaded the clay to press out any air bubbles that might be in the clay. Any air bubbles remaining in the clay will cause it to explode when it is heat-dried; therefore, it is important to remove all air bubbles. However, our beads were only air-dried so it was not as critical. Once we understood the concept of kneading, we started modeling our beads whichever shape we wanted. We were also provided with a wooden dowel to form the holes in the beads. When we were finished, the beads were set aside to dry. As soon as the beads were dry, we painted the beads with the colors we desired. The requirement was to make at least five beads and use three colors. When the paint was dry, we put the beads on a yarn to create our necklace.

 An extension activity for this lesson would be in math when first grade students learn about repeating patterns using 3D shapes and colors. The students would use the clay to mold the shapes, (ex. cube, cone, sphere pyramid). Then they would use various paint colors to color the shapes. Once the shapes are dried, each student will put shapes on a piece of year in correct shape and color sequence to create a repeating pattern.