Monday, December 12, 2011

Stained Glass Window Art

For our final art class, my partner Robert Stahl and I presented an art lesson that was about Stained Glass artwork. The students’ assignment was to create their own stained glass art using tissue and construction paper.

We began the lesson by stating that our lesson today will be based off from ancient European artwork. Then we went over a PowerPoint containing facts of the origin and use of Stained Glass art in Ancient Europe. As we presented the PowerPoint, students were required to write three facts about Stained Glass Art on a note card that would be presented with their artwork. After we had discussed the important vocabulary of the lesson, we demonstrated to the students how to safely use an X-acto knife and glue the tissue paper onto the construction paper; the students started doing their artwork project.

To begin the assignment, the students first chose one of the four patterns that we had provided for each student. (Since our presentation was near the Christmas holidays, we decided to have students do their artwork based off Christmas items/scenes; such as, candle, bells, nativity scene, and Christmas tree). Once the students had chosen a pattern, we helped them staple the pattern on a piece of construction paper. The students then carefully cut out the inside space of their patterns using an X-acto knife. Once all the inside spaces were removed, the students began to glue tissue paper on their pattern. They were required to use at least two different color schemes (e.g. warm and cool colors). When the artwork was finished, the students wrote their name on the back and handed it in for grading.

The following photo is my example of stained glass art. I used cool colors on one bell and warm colors on the other bell; this naturally also gave my artwork complementary colors.

An extension activity with this stained glass art would be when students learn about the four seasons. The students would choose a scene (this would be provided by the teacher) from each of the season. Depending on the age group, children may be too young to properly use an X-acto knife; as a result, the teacher may have to do the precise cutting. When all the negative spaces are cut out, the children would use tissue paper to create colorful spring, summer, fall and winter scenes. When finished, the artwork would be displayed on the classroom windows.

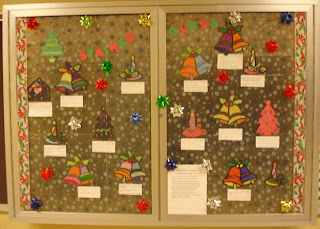
We displayed the students’ artwork in a lighted glass case in the hallway near the art classroom. We used a Christmas/winter background and decorations to set up our display. The following photos are our stained glass artwork display.

Here is our Stained Glass Art Lesson Plan:
Teachers: Jonathan Stahl, Robert Stahl
Lesson Title: Ancient Europe and Stained Glass Windows Art.
Grade Level: 4th Grade
Developmental Characteristics: The class has been studying a unit on Ancient European history, specifically culture. To reinforce what they have learned they will create stained glass window art. Another purpose of this lesson is for 4th graders to create art by arranging various shapes and colors. 4th graders will typically select and arrange objects to satisfy their compositional design needs. Students will also demonstrate their ability to make precise cuts on tissue and construction paper to create their artwork. 4th graders typically have improved eye-hand coordination which will help them in this task.
National Visual Art Standards:
Standard 1: Understanding and applying media, techniques, and processes.
d. Students use art materials and tools in a safe and responsible manner.
Standard 4: Understanding the visual arts in relation to history and culture.
a. know that the visual arts have both a history and specific relationships to various cultures.

Objectives:
Art Production: The students will use an exacto knife in a safe and responsible manner while creating their artwork.
Artistic Perception: The students will be able to identify and list two different color schemes in their own artwork.
Art History: Student will be able list three stained glass window history facts from PowerPoint to display with their artwork.
Art Materials: tissue paper, construction paper, note cards, scissors, glue stick, and exacto knife for each student.
Instructional Resources:
· Stained Glass History PowerPoint
· Examples of stained glass tissue paper artwork
· Grading Rubric
· Color Scheme Handout
Vocabulary (Elements and Principles of Art):
· Organic shapes: Shapes that are not regular or even, using a combination of edges that are curved or angular (often found in nature).
· Geometric shapes: Two-dimensional shapes created by exact mathematical laws; oval, circle, square, triangle, and rectangle.
· Color Schemes: Color is divided into groups based on the way they are placed on the color wheel: warm colors, primary colors, secondary colors, complementary colors, analogous colors, etc.
Procedure:
Anticipatory Set (Motivation): The teachers will show short PowerPoint of the history of stained glass windows. Students will list three facts about the history of stained glass artwork on a piece of paper to display with their artwork.
Step 1. The teachers will show examples of stained glass artwork that was created with construction and tissue paper.
Step 2 (Instructional Input): The teachers will inform students that they need to use at least two different color schemes in their artwork (Ex. Warm colors, cool colors, primary or secondary colors, etc.). The teachers will provide students with a handout that gives a definition of each of the different color schemes.
Discuss organic and geometric shapes and the different color schemes.
Step 3 (Modeling): The teachers will model how to cut with an exacto knife in a safe and responsible manner.
Step 4 (Guided Practice): The teachers will show students how to create stained glass tissue paper artwork.
1. Begin by having students staple their pattern onto a piece of construction paper of their choice.
2. Cut out pattern with exacto knife and/or scissors.
3. Using a glue stick, glue tissue paper on the back of stained glass construction paper pattern.
Step 5: The students will create their own stained glass artwork with construction and tissue paper.
Step 6 (Display): The stained glass tissue paper artwork will be displayed in a lighted, glass artcase. Each student’s stained glass history fact note card will be displayed alongside their artwork. The lighted artcase will give the artwork a stained glass look. A Christmas theme border will be used to give the case a finished look.
Check for Understanding: The teachers will review the rubric and grading procedures to help students understand what is expected of them.
Closure: Ask students to volunteer to show their stained glass artwork and point out the color schemes, organic or geometric shapes used.
Clean Up: The students are responsible to clean their own work area.
Student Evaluation: Students will evaluate their own artwork by comparing it to the criteria on a rubric.
Integration: This art project could be used in a science project specifically when studying why leaves change color. They could create stained glass artwork of colorful autumn leaves.
Teacher evaluation:
· Did students use at least two of the nine color schemes in their artwork?
· Could students identify two color schemes in their artwork and list them on a rubric?
· Students included three stained glass facts from the PowerPoint (on a piece of paper) which will be displayed with their artwork.
· Did students use scissors and exacto knife in a responsible manner?


Wednesday, December 7, 2011

Cave Art Comes Alive

For art class this week our assignment was to create cave art using a crumpled brown paper bag and mud paint to produce our paintings. The teachers began the lesson by explaining that many years ago people drew paintings on the walls of their caves to tell stories from their lives. This led to a discussion of how people in ancient times recorded stories by drawing and painting with natural products such as berries for coloring and mud as the medium. Our art project would be based off this ancient concept.

To begin the art project, each student was provided with a crumpled paper bag and red, green, blue, brown, black, and yellow mud paint. Then we were told think of one of our favorite childhood memories and sketch a scene of that memory on the paper bag using finger painting to create the scene. We were required to create texture in our work and apply one other natural element such as real grass, leaves, pine needles etc. to our painting.

The following photo is a scene from one of my favorite childhood memories. One of my favorite memories is gathering straw bales after wheat harvest. Even though, I was sweating and itching from the hot August sun and the straw dust, I enjoyed the work very much. The lone tree in the background is a typical scene in South Dakota farm fields.

An extension activity with this cave art lesson would be in science when students learn about different animals and their natural environments. For example, for beavers, the students would paint a lake with a beaver dam and the beavers lodge; for bears and wolves they would paint a cave; for birds and other wild animals, they would paint a woodlands etc. The paintings would correlate with nature because students use natural products to create them. When finished, the paintings would be displayed on a bulletin board.

Print Making

Our second assignment for this week’s art class was to create a nature scene on a piece of construction paper using foam paper and paint. After reviewing the vocabulary of the lesson, the teachers showed us some examples of their art and several visuals on a PowerPoint that we could use to create our own art projects. Then the teachers demonstrated how to create a scene on a piece of foam paper using the end of a paintbrush.

The following photo is my nature scene; I have a butterfly and bee flying around a flower in the warm spring sun.
To begin our art project, we used a blank sheet of paper to practice sketching the scene we wanted on our foam paper. Once we were comfortable with sketching the scene, we started engraving it on a piece of foam paper using various line patterns. When the desired scene was completed, we chose a paint color that we wanted and used a sponge roller to cover the entire area of the foam paper. Then we turned the foam upside down and pressed it onto a bigger piece of construction paper; preferably, one with a complementary color of the paint we used, such as yellow and purple. When the foam had been firmly pressed against the construction paper, we carefully removed it to reveal a mirror image or the scene we had engraved on the foam paper.

An extension activity with this foam paper art would be in language arts after students’ summer break when they return to school. Students would engrave a scene that represents an activity that they really enjoyed doing during the summer (such as swimming, camping outside, going on a picnic, etc.). When the students are finished with the art, they would write a story that explains their art. Then the students’ art would be displayed along with their short story.


Tuesday, November 22, 2011

Little Leaves

Our assignment for this class was to create a leaf collage using wax paper and oil pastels. To motivate the students, the teachers first read the book “The Little Yellow Leaf.” After the story, the teachers prompted a discussion of changing seasons and different colored leaves while also discussing warm and cool colors.
To begin the art project, the students were asked to write their favorite fall memory on an index card. Then each student was provided with a piece of wax paper and three warm colors (red, yellow, and orange). Using a file, the students grated the crayons to create red, yellow, and orange shavings. When we had enough shavings, we folded the wax paper and ironed it to melt the shavings creating a colorful collage. Then we cut at least three warm colored leaves from the wax paper and pasted them on a piece of white paper. Next, we used oil pastels to draw cool colored (blue, green, and purple) leaves on the white paper mixing them in to create a collage reflecting a pile of colorful leaves. The photo to the left is my leaf collage.

An extension activity with this wax paper collage lesson would be in 3-5 grade science when students learn about the different planets in the solar system. Similar to our assignment, the students would grate various different colored crayons on pieces of wax paper to create different mixes of colored collages. Then the students would cut out pieces of the colored wax paper that have colors most similar to each of the planets (e.g. bluish for Neptune and Uranus; red orange for Venus and Jupiter, etc.) When the students have all the planets cut out, they would paste them in the correct order on a piece of white construction paper with one fact of each planet written beside each or their wax paper planets.   

Under Water World

For this class, our assignment was to create an underwater world scene using black scratch-art paper. The teachers first introduced the lesson with a discussion of what animals we might find in the ocean, reviewed the important vocabulary words for this lesson, and presented some examples of scratch art for students to look at. Then each student was provided with a pointed wooden dowel (this was used to draw on the scratch paper) and a small sample of the scratch paper to practice drawing on it. After we had practiced with the sample piece of scratch paper, we began our own scratch art.

From a variety of pictures, we chose an underwater creature that we would like to draw. Once we had chosen our preferred picture, we sketched the picture in the center of a folded 8.5 x 11 blank paper. Then we put a piece of the scratch paper in between the folded 8.5 x 11 and traced the picture with the pointed dowel to the scratch art. After we had traced the picture to the scratch paper, we used the dowel to scratch our drawing onto the black scratch paper; adding details and an appropriate background using lines, shading, and pressure. The following is a photo of my underwater world scene.

An extension activity with this scratch art lesson would be in geography when students learn about the seven continents. Students would choose the continent of their choice and draw it on a piece of art scratch paper. Then students would do some research on their choice of continent and write some interesting facts about the continent on an index card. When finished, the students’ drawings would be posted on a bulletin board including their index card with the facts written on it. Then the whole class would view the drawings and each student would explain an interesting fact about their continent. 


Thursday, November 10, 2011

Birds of Feather

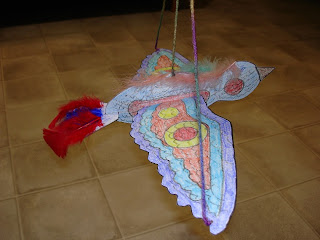
For this art class, our assignment was to create a 3D paper bird. The teachers introduced the lesson by showing a video about a flock of birds that did not accept another bird because it was different than they were. The focus of the lesson was diversity; we are all different, and these differences are what make each person uniquely beautiful. We were to create our own bird with its own unique looks and personality.

Before we began our art, we wrote a description of our bird on a note card. I decided to name my bird “Red Cheeked Flyer.” My bird is a native of the Tropics. The bird’s beautiful designs are reflected in his easygoing nature. The Red Cheeked Flyer is friends with all birds and will be the first to make friends with new birds that arrive in its territory. The bird uses his sharp eyes to hunt for food and detect danger from far away.

Once we were done with our note card brainstorm, we began cutting out the outline of bird parts (body, winds, tail). Then we colored the bird with patterns and designs to give it a textured look. We were also required to apply tactile texture on the bird using feathers and/or tissue paper. When finished decorating, we glued the pieces together, we punched holes on the bird’s body and wings, and attached three pieces of yarn to hang our completed bird.
An extension activity for this lesson would be in science when students learn about different types of animals and their habitats. The teacher would create different spaces consisting of different habitats on the ceiling of the classroom. Then each student will construct an animal (the outline would be provided by the teacher) from a different habitat. When their animal is completed, the students will hang it in the space where their animal’s habitat is located.

Beaded Clay Necklace

For this art class our assignment was to make a beaded necklace with molding clay. After reviewing the main vocabulary words for this class and showing the students some sample beads, the teachers provided each student with a handful of clay. Then the students kneaded the clay to press out any air bubbles that might be in the clay. Any air bubbles remaining in the clay will cause it to explode when it is heat-dried; therefore, it is important to remove all air bubbles. However, our beads were only air-dried so it was not as critical. Once we understood the concept of kneading, we started modeling our beads whichever shape we wanted. We were also provided with a wooden dowel to form the holes in the beads. When we were finished, the beads were set aside to dry. As soon as the beads were dry, we painted the beads with the colors we desired. The requirement was to make at least five beads and use three colors. When the paint was dry, we put the beads on a yarn to create our necklace.

 An extension activity for this lesson would be in math when first grade students learn about repeating patterns using 3D shapes and colors. The students would use the clay to mold the shapes, (ex. cube, cone, sphere pyramid). Then they would use various paint colors to color the shapes. Once the shapes are dried, each student will put shapes on a piece of year in correct shape and color sequence to create a repeating pattern.

Monday, October 24, 2011

Hidden Safari Animal

For this Art Methods Class, our assignment was to create a free-hand drawing of a Safari animal with a blue (cool) color and hide the picture with red, orange, and yellow (warm colors). To see the picture you have to wear special glasses that reveal the blue outline of the drawing. The following picture is my hidden Safari animal.
Our first task was to make our own glasses that would help us see the hidden animal in the picture. We took a 4”x12” piece of construction paper and cut an oblong hole across the paper to look through. Then, we taped a piece of red cellophane on the back of the construction paper, creating our special glasses.
For the animal drawing, we chose an animal (ex. elephant, lion, monkey, zebra) of our choice from variety of visuals. Then we used upside-down contour drawing to help us sketch an animal from one of the visuals using a blue colored pencil. When finished with the drawing, we used red, orange, and yellow color patterns to conceal the animal drawing. With each layer of color added, we took our glasses to ensure that the animal was not hidden too much. Once we were satisfied, that the animal was hidden from the naked eye but visible with the red cellophane glasses, we framed the picture for display.
This activity could also be used for a 4th grade social studies lesson when students learn about the 50 States. The students would draw or trace the outline of every state using a blue colored pencil. Then they would use warm colors to camouflage the image. When finished, the camouflaged illustrations would be hung on the wall. Beside each picture, there would be a note card with three clues of the state that is hidden and student would have to guess which one it is.

Tuesday, October 18, 2011

Eric Karle Inspired Story Book


The following picture is an Eric Karle inspired story book we did for our Art Methods Class. Our assignment was to create a two-page storybook layout based on Eric Karle’s artwork. To do this project we had to prepare various colored sheets of paper a week in advance. First, we took a 12X18 sheet of white paper and moistened the surface of the paper with a sponge brush. Then we splattered several colors (ex. white, blue, and yellow) on the paper. Once we had the desired mix of colors on the paper, we took a sponge paintbrush and spread the paint all over the paper. Each student created three of those pages and put them away to dry. Meanwhile we were to think of a storybook scene that we wanted to have on our two-page storybook layout. The next class period we met, our paste paper was dry, so we sketched our characters on the paste paper and cut and glued the characters on to 12X18 piece of construction paper. The scene is about a naughty kitten that always scares a goldfish in its tank. On the next page, the neighbor’s bulldog chased the kitten up the doghouse. After that, the kitten never again teased the goldfish. The words read, “You naughty kitten! See how it feels to be scared.”
An extension activity with this collage would be 4th grade science when students learn about the animal food chain. Similarly, the students would create a booklet for a grassland biome food chain. On each page, they would have an animal or plant in the correct order of the food chain. Students would label each page, “primary producer, primary consumer,” etc. and explain the role each animal plays in the food chain.

Monday, October 10, 2011

Van Gogh Inspired Fingerpainting

The following picture is an art activity that we did for our Art Methods Class. For this particular class period, our theme was Vincent van Gogh and his painting “Starry Night.” Our requirement was to create a painting similar to Van Gogh’s “Starry Night.” Using finger painting with the three primary colors, black, and white, we painted on white paper. Although, we could choose our own scene we still had to imitate some of van Gogh’s swirls and strokes, textures, shades, and tints, as well creating space by having a foreground, middle ground, and background. For this picture, I tried to make it similar to van Gogh’s painting. However, I could not and did not want to make it exactly similar. I did try to keep the theme and motion of “Starry Night” by creating swirls and similar settings, yet my painting is very different. I really enjoyed experimenting, making swirls, and mixing colors to create different shades and tints in the center swirl and the distant skyline.
An extension activity with this finger painting would be science where students learn about the seasons. The students would use the finger painting to create a scene of their choice for each of the four seasons. For this activity, students would have the opportunity to use the primary colors, black, and white and they would learn how to mix colors to create different shades, tints, and a variety of colors to make their painting colorful depending on the season they are painting. This activity would take more than one class period to complete.

Van Gogh Inpired Cityscape Collage

The following tissue collage is also a Vincent van Gogh “Starry Night” theme. For this art project, we were required to create a city/farmscape that would resemble van Gogh’s “Starry Night.” We used tissue paper to create swirls similar to van Gogh’s painting style. To begin, I took a variety of different colors tissue paper and cut out pieces with varying designs (swirls, circles, lines, etc.). Then I took a piece of blue construction paper and pasted the tissue paper cuttings onto the construction paper with an acrylic paste. Afterwards, I covered all the exposed areas of the construction paper with the acrylic paste to seal it off. When the tissue collage was dry, I pasted a farm scene cut out of black construction paper onto my collage to create a farmscape. Then I used various colors of oil pastels to create an outline of the farm scene, to emphasize, and to create movement in the tissue swirls. 
An extension activity with this tissue collage would be for a third grade social studies class. When studying maps the students could use tissue paper to cut out shapes of buildings, roads, lake, trees, etc. as their map symbols. Then they would paste the tissue paper cuttings onto another piece of construction paper to create a map of a town. They could also use the oil pastels or permanent markers to create fine details on the map. When their project is finished, the students would present it to the class and explain the reason and makeup of their town map.  

Thursday, September 29, 2011

Elements and Principles of Art Scavenger Hunt

This quilted center piece has a varied pattern

These seesaws show unity at our colony's school playground

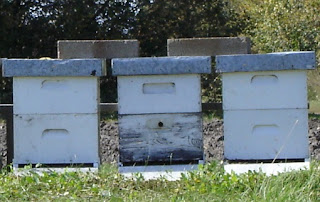
Beehives at colony showing balance

White clouds on a clear, blue sky represent movement

A steel studded building at our colony symbolizes lines

Monday, September 19, 2011

Foot Project

Our first project for K-8 Art Methods was creating an introduction of ourselves using an outline of our foot. First, we took a sheet of construction paper and traced our foot on it. We then cut out the outline and decorated the footprint with pictures, drawings, clippings, yarn, etc. We could use anything that represented our lifestyle, interests, and hobbies. We were required to use three different media such as markers, magazine clippings, yarn, leather, or construction paper. To share our ideas and introduce ourselves to the class, we presented our footprint project to our classmates. It was a great idea to introduce ourselves and learn from each other.
My Family: My wife and three children make up a huge part of my life. I love spending time with my family, which I do a lot, because being the parents of three children keeps us very busy.
My home (at left) and the road to Northern State University (at right): I drive to and from school every day. The distance one way is 60 miles (I included mile markers to demonstrate the distance). On the right hand side is the H.P. Gerber Building, NSU’s School of Education.
The little red car: This is the car that I use to drive to school.
The white board with trigonometric formula: I like math and I enjoy taking math courses at NSU.
The carpenter’s apron:  I enjoy doing carpentry during my school breaks.

This footprint activity could be used in health education class for grades 3-5 or 6-8. To encourage students to be physically active they would keep a log of their physical activities for a week. For each activity, the students could either write or put a picture of the activities that they were doing during the week. Beside each picture or description the students would record the time that they spent being active (This would work better for older students). At the end of the week, each student’s footprint would be hung on the wall for comparison.